Mike's
Woodworking Projects
Villa Park, CA
10/18/2022 I was asked by a friend to build her a special table. Her husband, Eric, who was a woodworker, passed away a few years ago. She had a stone pietra dura that they had gotten on one of their trips. She wanted a table about 23 inches high, and about 16 to 17 inches across, with the pietra dura inset into the top. She also wanted cabriole legs.
When her husband passed away, she gave me some wood from a macadamia tree that they had cut down and her husband had dried in the attic. I decided to use that for the table. The wood was already cut to a bit thicker than 1 inch so I had to glue pieces to make the legs. The wood worked well, but I had problems with the finish because it tended to splotch. I used dewaxed shellac as a sealer and then applied a stain over the shellac (golden maple stain). Then I finished with water borne lacquer.
I was pleased with the way it came out. She picked it up today and seemed pleased with it.


Here's a picture of the underside of the top, showing how I made the aprons. They are brick laid and then cut to the curve on the bandsaw. The arc was sanded and then I applied a 1/16 inch shop sawn veneer of macadamia wood. Note that two of the aprons are poplar because I didn't have enough macadamia. Doesn't matter because they don't show.

9/1/2022 Judy wanted a stand for her iPhone so I built a few stands like this one. This one is teak. The back is 7 1/2 inches high and the support is 5 1/2 inches long. I cut a slot in each piece half way and then slipped them together. The finish is shellac.
There's a hole in the support piece to allow the charging cable to be connected to the phone while it's sitting in the stand.


Here are a couple of pictures of one stand prior to assembly. The wood is avocado. On the left is before final sanding to ease the edges and the right is after sanding and applying finish. I have to sand the pieces before cutting the slots because if I fit the slots tightly, and then sand, the slots will be loose because of the wood I sanded off. The hole is 5/16" and centered.


I wound up making about a dozen of these out of scrap wood I had. Gave them away as gifts.
I have a Festool Kapex sliding miter saw and it has a feature that makes cutting the slots fairly easy - although I have to be very careful about how wide I make the slots so that they fit together fairly tight.
6/3/2022 In going through some old pictures, I found a web page I had made back in 2004 about a visit with Sam Maloof. Take a look. Sam was a very interesting guy who loved to talk with other woodworkers and he had an enormous number of stories from his life.

6/1/2020 I decided to use the rest of the avocado wood that I had to make a small end table. You can see the process of making it here.

5/19/2020 This isn't fine woodwork but we have a decorative arch in our yard that was getting rotten at the bottom of one post. Here's a picture of the wooden arch. You can see the process here.

4/19/2020 Since we have to "social distance" and stay home, it's a good time to do some woodwork. Judy asked for a bench for the bathroom some time back and now was the time to build it. Here's the bench - I still have some finishing to do but you can see what it looks like.

We lost a 75 to 80 year old avocado tree a while back and I saved some of the wood and put it in the attic to dry it. That's what I used to build this bench.
It's built in two parts, the seat and the support. Here's the support part that the seat fits over.

And a view into the bottom of the seat. I'll use screws to attach the seat to the frame once I'm finished applying the finish. I thought it came out well and I like the look of the avocado wood.

12/15/2019 I had quite a bit of wood that a friend gave me but it was thin and fairly short. So I decided to make cutting boards out if it. I cut the boards into strips about 3/4" wide and then turned the strips 90 degrees and glued them together. This made a board about 3/4" thick with a lot of strips, each less than 1/2 inch wide. The patterns that resulted were interesting. I made about ten of these and gave them as Christmas gifts - and didn't take any pictures of them Here's one of the lesser ones that I still have.

Here's a better looking one that I have wrapped. I didn't want to unwrap it to take a picture. I put the boards through my drum sander to get them flat, then sand them to 220 grit with a ROS (random orbital sander), then wet them to raise the grain and when dry do a final sanding with 220 grit. I oil them with mineral oil which is food safe (you can purchase it in the pharmacy as a laxative). Wipe the excess oil off and it will dry - I put the board in the sun to speed the drying.

7/24/2019 A friend gave me a piece of a beam taken from his house during a renovation. Once I removed the nails, I decided to make a boat bowl. It's about 19 inches long, 10 inches wide and 3 1/2 inches high. It's a lot of wood to remove!

7/22/2019 I did a sequence of videos on how to make a jewelry box. Here's the jewelry box that was made in the video

And here are the videos - Part One: I'm still learning about how to do videos and this three-part sequence has some production problems. Hopefully, I'll improve with experience.
Part Two:
Part Three:
2/17/2019 A couple of years ago, we had to have some olive trees taken out - they had gotten infected with some virus that would kill them. I cut some of the larger pieces into boards and put them in our attic to dry.
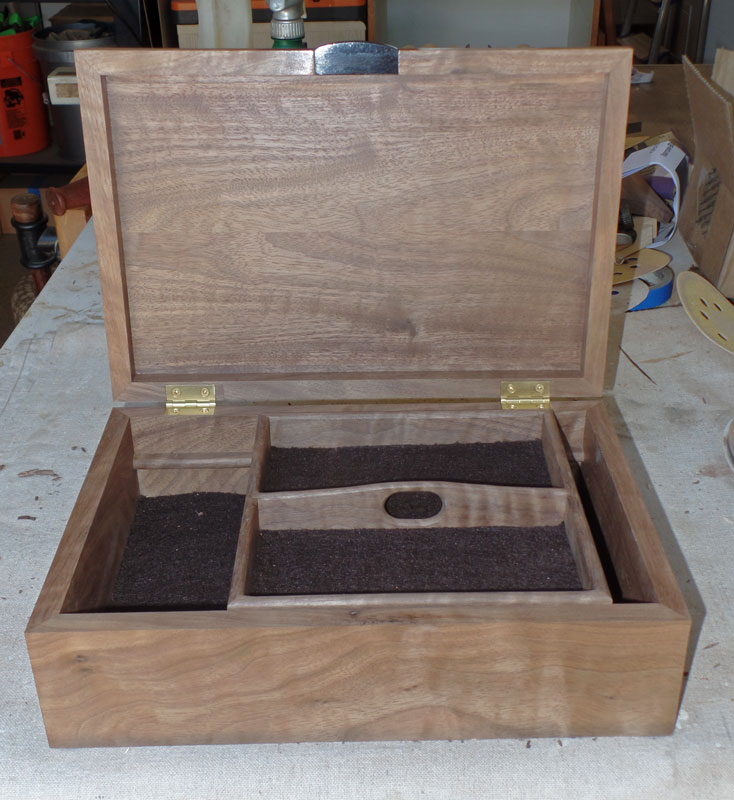
Early this year, I took some of the wood down and flattened it on the jointer and resawed it to make a box. Here's the box I made.

The wood had a lot of splits on the inside so I filled those cracks with epoxy. The top is made from a section of board that I resawed. I thought it produced an interesting pattern.

Here's the box open showing the tray.

I was able to flow the grain figure around the corners.

Here's the bottom.

4/29/2018 Some time ago, I designed a bee vacuum with some innovative features. I posted a video on YouTube showing how it works and I received some request to sell the bee vacuum. But there's a fair amount of work that goes into building it and I doubt if anyone would pay me for the time it took me to build the bee vacuum. So I did a video - it was long so I broke it into three parts - and put them on YouTube. Here they are:
Part 1 describes how to build the basic box.
Part 2 shows how to cut the handles and then how to make the internals.
Part 3 is how to make the top, and finished with a discussion of how to use the box.
3/8/2018 I was asked to make a drop-down table for an RV to replace the existing one. Here's the old one:
Front and back view - it's Formica on particle board.


Here's the replacement table I made. It's made from Ambrosia Maple. Front and back view: I don't know if the table is in an upright position when not in use. If so, the back will show.


I finished with semi-gloss pre-catalyzed lacquer for a tough finish.
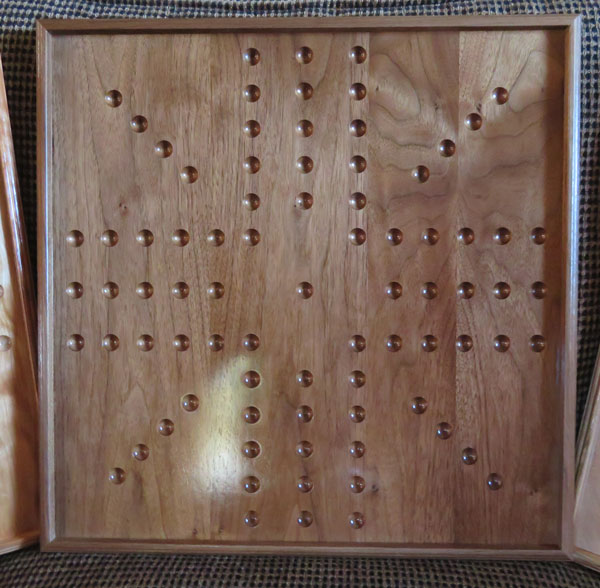
12/24/2017 Last year, I made six game boards for a friend. This year, she came back and asked for five more. I hadn't documented the layout but she still had one board that I could take measurements from. I found some nice figured cherry and made the boards out of that. Here's a picture of one board, front and back. I actually photographed two boards so the front and back may be from different boards, but it looks like the same board.
There are 81 dimples on the board, made with a cove bit in a trim router with a plunge base - 405 dimples in all. That can get really repetitive. Here are some notes on making a board.


7/12/2017 Our old refrigerator was gradually giving out - not being able to keep the interior properly cool. We had had problems with it in the past so we decided to bite the bullet and get a new one. The old refrigerator had wooden panels on the doors to match the rest of the cabinetry so we decided to go the same way. The doors were a different size from the old refrigerator so I had to make new panels for the new refrigerator.
Judy found some interesting handles - called "Aspen twig pulls" by a company called "Top Knobs".
I selected some figured cherry for the panels. It took a lot more work to make the panels than I expected but I think they came out pretty well. The cherry will darken with age, which is a shame because I really like the light color of cherry.


12/25/2016 I was asked by a friend to make some game boards for their family. They've played a game called "Wahoo" for over 40 years, using a game board that was made by one of the family members. Wahoo (also called "Aggravation") game boards are available commercially but the layout is a bit different, including the number of holes, than what they play so they needed the boards custom made. I made six boards, two of ambrosia maple, two of figured cherry, and two of walnut. I hadn't finished one of the walnut boards when this picture was taken. The boards are all the same size, 17" square, but the picture makes the ones on the ends look larger.
It's played with marbles as game pieces.

Here's a close-up of one of the ambrosia maple boards and one of the walnut boards. The figured cherry boards really came out nice but don't show well in the pictures.

I did the holes with a plunge trim router and a 5/8" cove box bit. The sides are raised to keep a marble from rolling off the board. If I counted right, there are 81 holes per board, or a total of 486 holes in the six boards.
7/22/2016 Here's another jewelry box made from ambrosia maple, but this time I trimmed it in ebony. I didn't like the final result - too much black trim.


5/15/2016 We've been busy with a lot of non-woodworking things and I've only just been able to get back to making things. This is a jewelry box made from ambrosia maple - lots of streaks and a few worm holes. I've not worked with maple very much because it's generally a non-descript wood. But this maple was very interesting.
Anyway, here are some pictures. First, a front view.

Then a corner view to show how the figure flows around the box

Next, the top.

Now, the inside.

A better view of the tray.

And the bottom. I had done this compass rose a while back but messed up the border. So I cut the border off and used the compass rose for the bottom.

2/20/2016 Judy requested that I build a three-legged corner table for a certain part of our house. To make sure I was building what she wanted, I first made a prototype in ash to work out some of the joinery and design issues. It really helped. Here's the table with a coat of shellac on it. I'll spray a coat of lacquer on it in the next few days.

Here's the prototype:

I fluted the legs:

Making the top was a challenge. Here's the top in process:

After a lot of hand work with carving tools, this is how it came out.

2/28/2016 A while back, someone gave me a bunch of aromatic cedar. While I always like to get free wood, it was taking up space in my shop and getting in my way. Judy, my wife, suggested that I use it to make her a blanket chest, and that's what I decided to do with it.
The basic structure is the aromatic cedar, with figured mahogany veneer covering it on the outside. The base is solid mahogany. The hinges are some I found at Rockler. They hold the lid at any angle and don't let the lid drop - you have to push the lid down to close it.
It's 36" wide, 17 1/2" front-to-back, and 15" top-to-bottom inside.
Here's a view from the front:
![]()
A front quarter view to show the side:
![]()
And a view inside to show the aromatic cedar.
![]()
1/5/2016 Another year!! After I made the larger dovetail markers (shown below), I made some smaller ones. These are 1" down and 3/4" deep (on the outside). I put a few of the larger ones (2" down and 1" deep, outside measurements) in the picture to show the difference in size. These are 7 degree markers, also.

12/10/2015 I made a dozen dovetail markers from some brass angle. The markers are cut at 7 degrees. They'll be used in my hand cut dovetails class.

A view from the side.

12/9/2015 A beekeeper friend asked me to build a solar kiln big enough to put up to 10 full size frames into. I did some research on the web and this is what I came up with.

The main part of the box is tilted at 15 degrees. It's lined with insulation which will take the heat generated in a solar kiln. There's a door on the front to allow access to the pan where the wax is collected.
Missing is the internal metal pan which the wax drips onto. Her husband is a good metal worker and will build that. She'll paint it.
Next, a view from the side.

And a view with the top open. I used two layers of acrylic, separated by about an inch on the door. The door has a support so it will stay open. Note the frame supported in the box

And a close-up of the interior of the box showing the frame in it.

The interior needs to be painted black to maximize absorption of the sunlight.
9/9/2015 I finished a box for a relative. It's made of walnut and is about 20" wide, 14" deep, and 12" high, not including the serpentine top. Here's a front view. The handle is ebony. I used the most figured wood I could find for the top.

A view from the corner to show the serpentine top.

A view into the box. I made a shallow tray of aromatic cedar.

A view into the interior without the tray.

And a closer view of the side showing the half-blind dovetails and the shape of the top

8/10/2015 I completed a tutorial on building a basic jewelry box. The box I made for the tutorial is the one in the following picture. You can see the tutorial here.

8/3/2015 I finished the corner cabinet. I finished the top, adjusted the doors, attached the top, put on some small handles and door latches (to hold the doors closed). I'm generally satisfied with the way it came out.
Here's a view of the exterior of the cabinet, in its place in the house, with a lamp on top. I put two very small "pulls" on the doors, towards the top. It's hard to choose a pull that doesn't detract from the veneer design and yet is still easy to use.

A view of the top - without the lamp.

A view of the interior, showing the veneer on the inside of the doors.

7/27/2015 I've been asked to teach a one day class on box making. Boxes are good for teaching woodworking because you use many of the joints and skills that you would use on larger projects and you don't use a lot of wood.
To prepare for the class, I made several boxes out of pine - just to see what will work well. Since the class is a one day class, I can't use dovetail joinery because I can't teach dovetails and box making in one day. So I'm going with miter joints. This allows the grain of the wood to flow around the box and a glued miter joint is plenty strong enough for a box. In making the boxes, I varied the thickness of the wood, the way the top goes on, and some techniques for doing some things on the box. For example, I hand beveled the top on a couple of these and cut at least one on the table saw. Here are some pictures of the pine boxes I made.
This first box has a lift off top. The top is held in place by the boards lining the inside which extend upward from the main part of the box. This box uses 1/2 inch material but it looks thicker because of the lining material. If this was a "keeper" box, I'd have taken the liner material all the way to the bottom of the box


This next box also uses a lift off top but the top is captured by putting a groove all around the top so that part of the top fits inside the box. This box is made from 3/8 inch material - which works well for this box.


I also made a lift out tray for this box.

The last box is one with hinges. The hinges are "stop" hinges that hold the top at about 105 degrees when it is open. The disadvantage is the cost of the hinges. This box uses 5/8 inch material, which is too thick. The box doesn't need that thickness for strength and it makes the inside too small. However, a box that uses hinges requires that the material be about 1/2 inch to match the hinges.


I made a lift out tray for this box, also.

The decision on what to use for class is 1/2 inch material and hinges. A woman I showed the three boxes to commented about the non-hinge boxes, "When using the box, you have to find someplace to put the top if you don't have hinges." Good point!
My projects continue here.