Mike's
Woodworking Projects
Continued
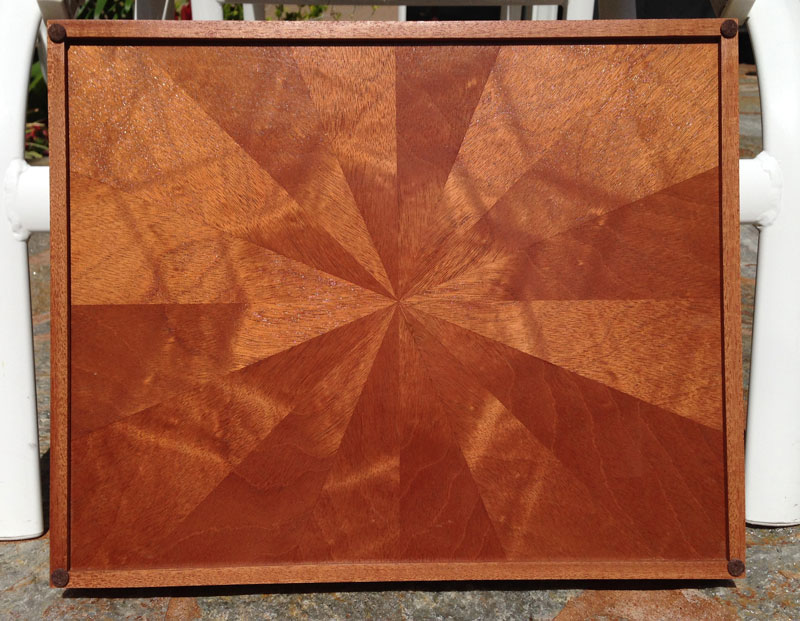
7/23/2015 I finally got around to making the top for the corner cabinet. I only have a coat of shellac on it right now so I still have to put lacquer on it. Hopefully, in the next few days.
The center is four pieces of crotch walnut, outlined in dyed white stringing. The border is figured mahogany.

I still have quite a few things to do. Once I go to attach the top, I'll probably have to trim the doors to make sure they don't rub on the top. I also need to figure out a way of keeping the doors closed - I'm thinking of trying to use magnets in some fashion. And I need to figure out what handles to put on the doors so they don't detract from the veneer work.
Here's a picture of the cabinet with the top just resting on it.

6/23/2015 I was sidetracked by other obligations for the past month or so and only just got back to working on the cabinet. I made the base recently.

Next, I'll start on the top.
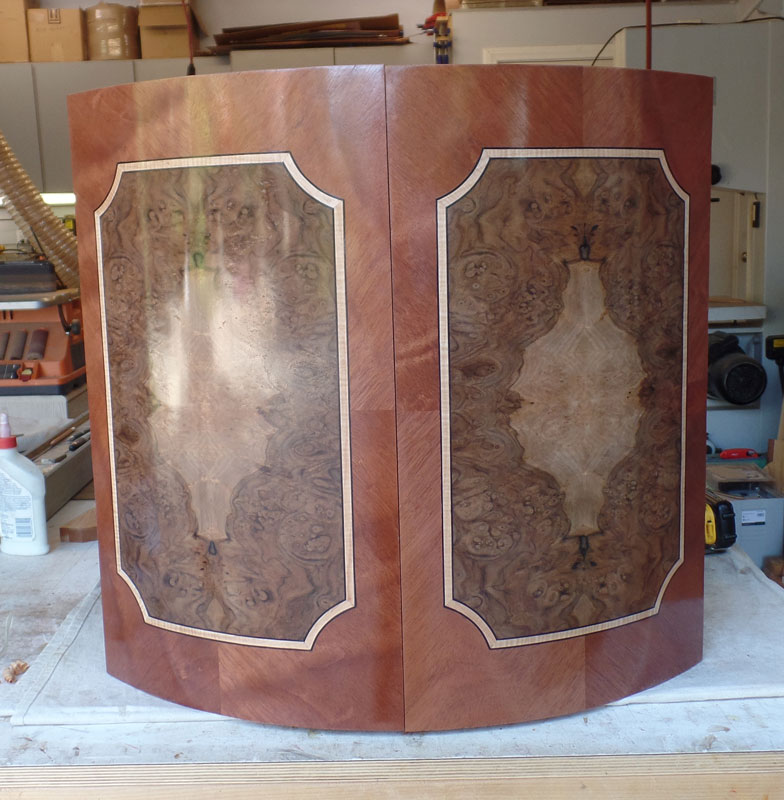
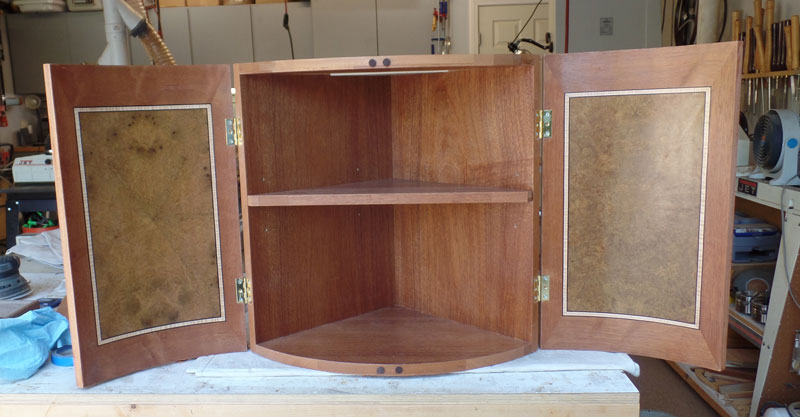
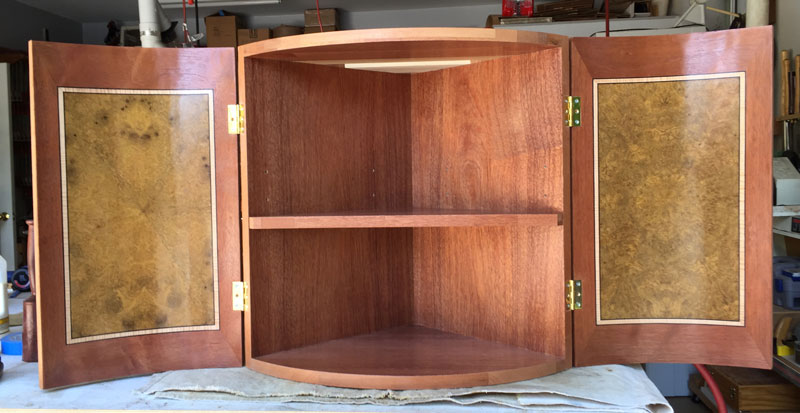
5/4/2015 I'm making progress on the corner cabinet. I veneered the front of the doors, applied finish and fitted the doors to the cabinet. The veneer on the exterior of the doors was challenging - probably 90% of the work was getting the curved corners in the banding.
Here's a view of the cabinet with the doors closed.
And with the doors open.
A view looking down on the cabinet.

I still have to do the top and base. The base will have a laminate bent front. The challenge will be to get the curve of the bent wood to match the curve of the cabinet.
I have no idea what I'm going to do on the top yet. I know it will be veneer but I haven't worked out a design yet. I'm sure I'll come up with something.
4/26/2015 I'm working on a corner table for Judy. I designed it with curved doors, with veneer on both sides of the doors. The top will be veneered, also, in some design that I haven't decided yet. Here's a picture of where I am on the project now. I have the doors coopered and fitted to the front of the cabinet and have laid veneer on the inside of the doors. The veneer inside the border is myrtle burl, with black stringing and figured maple as banding.
The shelf is adjustable, and is in the lowest position in the picture.
I still have to do the veneer for the outside of the doors, and build the top and a base. But so far I think it's coming out well. I like the color of the myrtle burl against the mahogany.
4/6/2015 I was commissioned to build a Langstroth style beehive in Western Red Cedar. Here's the hive, minus the cover. They want a gabled roof cover and the exact design has not been decided yet.
Red cedar is a nice wood to work with. It's light, cuts easily and smells good. The disadvantage is that it's soft so any small hit leaves a ding in the surface. Just requires care in handling.

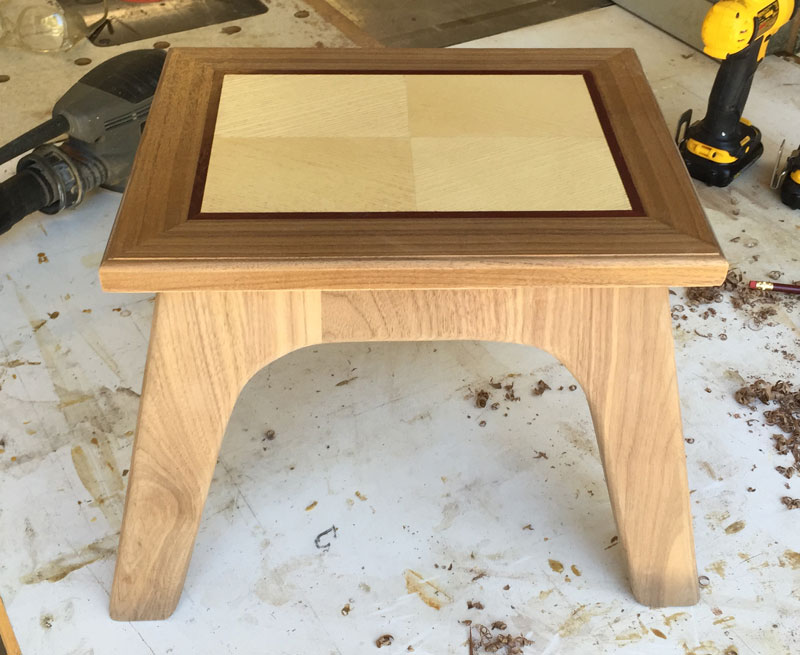
3/25/2015 I teach several woodworking classes at Woodcraft in Fountain Valley. One of the classes I teach is veneering, and in that class, the students do a panel with a four way veneer match. One of my students came to my shop and, using his panel as the top, together we made the legs for a stool. In the picture below, the legs don't have any finish on them but you can see what he did. The miters on the legs are very tight. Good job!
3/5/2015 I recently completed a top frame beehive. You can see the process here.

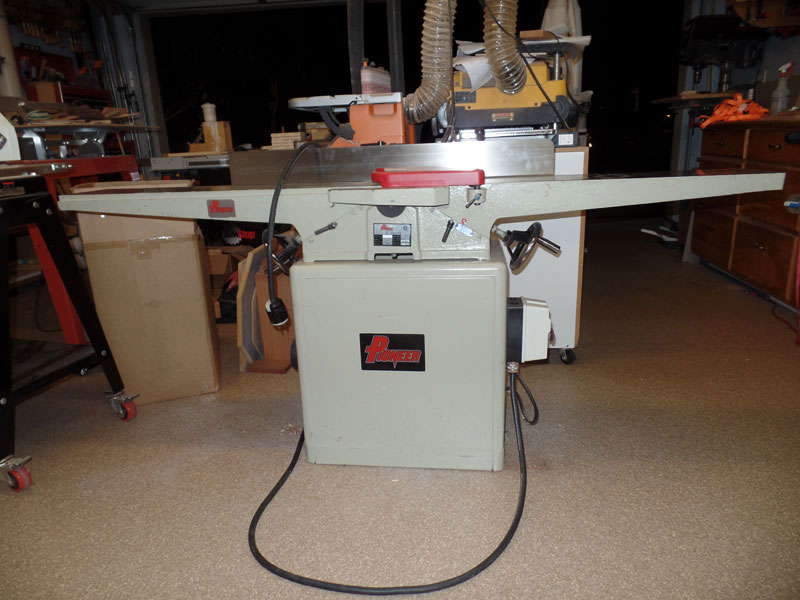
2/26/2015 I found a listing on Craigslist for a drum sander and bought it. However, the seller was selling a package of four tools and it was all or nothing. So I wound up with a Jet 16-32 drum sander, an 8" jointer, a 2HP dust collector and a Rikon model 50-120 disk and belt sander. I'm trying to sell the dust collector and the Rikon sander but the jointer and drum sander have found a place in my shop. [Update 4/6/2015: I sold the Rikon sander and the dust collector. I really like the jointer - works very well.]

2/14/2015 I decided to add another beehive on my property and this time I decided to build the hive myself. Here's a picture of the finished hive. It consists of a bottom, two full height brood sections, two medium supers, and a top. It's made from pine, which is pretty easy to work.
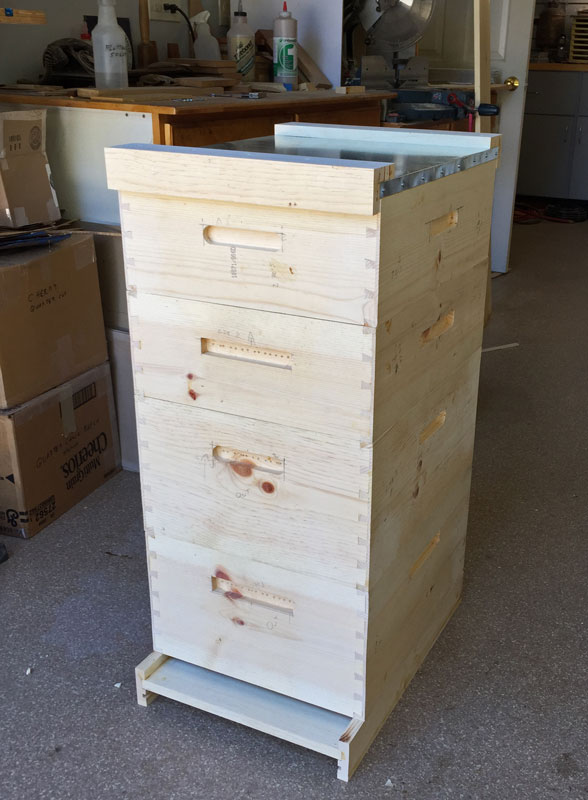
I made the boxes with hand-cut half-blind dovetails. I thought maybe the bees would appreciate having a home that was built like furniture so they'd want to stay, rather than swarm :-)
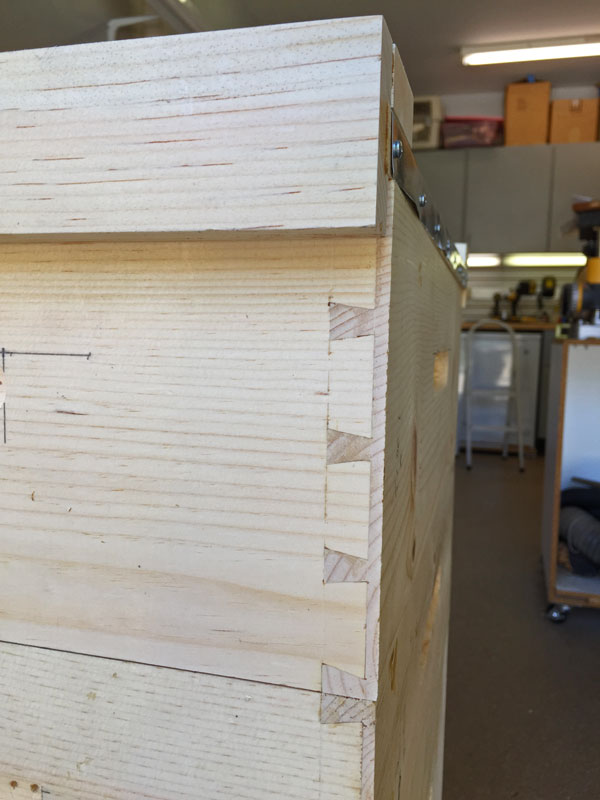
On the inside, I bent some sheet metal to cover the rabbets that support the frames. The metal is nice because it protects the wood of the rabbet from damage when you're working with the hive tool to separate of lift frames.

Finally, I made the top and covered it with galvanized sheet metal.
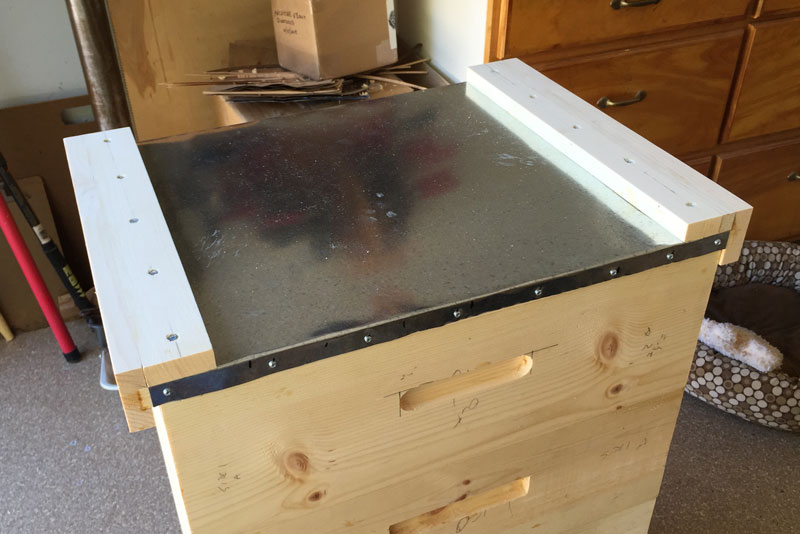
I still need to paint the hive. Then, get some bees.
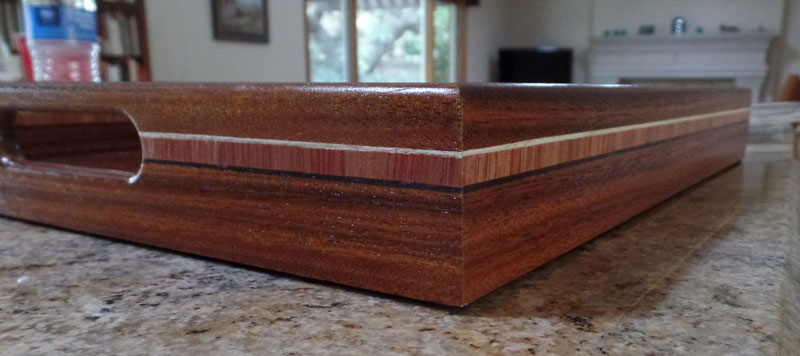
2/19/2015 Some time ago, I ordered some myrtle burl veneer from a supplier. When I received it, the shipper had crushed the box and some of the veneer was damaged. Enough of the veneer was undamaged that it was still usable so the supplier and I did a settlement to reflect the damage. I put the veneer aside and it just sat there for a long while. Recently, I was reviewing my veneer and found the myrtle veneer again. I had put the broken pieces in the package. While looking at the broken pieces, I began to wonder if I could do anything with it. This tray is what came from that musing.

The veneer is myrtle, topped (or bottomed, depending on how you like to look at it) with a banding of cross cut Macassar ebony with black and white stringing. The background is dyed black veneer. The myrtle veneer was let into the black, which was a real challenge.
The sides are teak. And to add some interest, I did a banding inside and outside of cross cut tulipwood bordered by white and black stringing. This is the first time I used teak for sides and I was very pleasantly surprised by how it finished. It's a very rich color. We often see teak used outdoors where it's weathered to gray so we tend to think of it as a boring wood. But it's anything but.
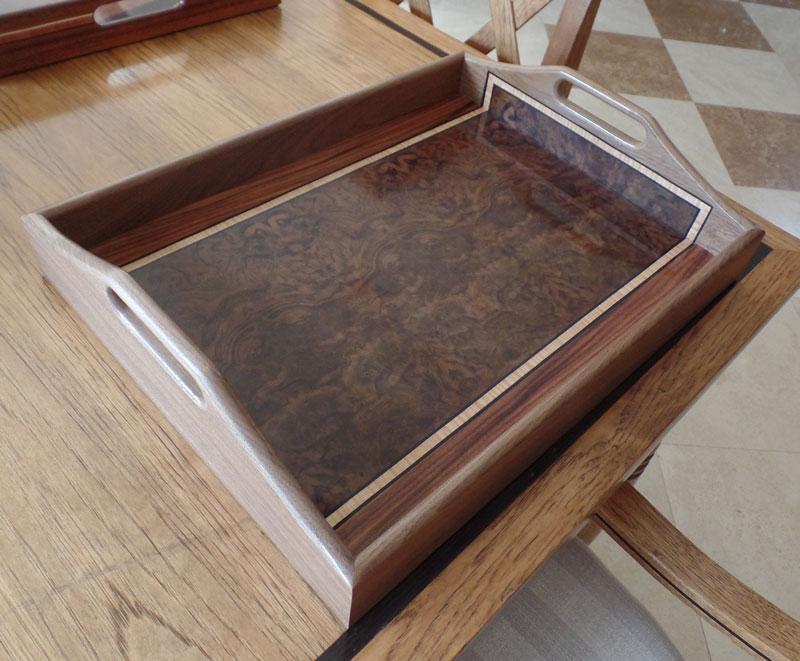
The other tray is made from some waste walnut burl veneer left over from a radial match. I trimmed it almost square and laid it in a bookmatch. The matches produced what looks like the faces of a dog. Since there are three of those matches in the middle, I call this the "Three Dog Tray." People have seen other dogs in the tray, above the three main images. The banding is fiddle back maple cut cross grain with black stringing on either side of the maple. The border is rosewood - some more left over veneer.

To add some interest, I ran the veneer up on the sides.
1/3/2015 I had the opportunity to purchase a used Mini Max 20" bandsaw from an estate. It had been sitting so it had some rust but it cleaned up well. Here's a picture of it in my shop.

I was very happy to be able to purchase it. I've been thinking of getting a better bandsaw for a while but couldn't afford it. Buying used, and from an estate, made it possible. Now, I have to build something with it to justify the purchase :-)
12/17/1014 I decided to go in a different design direction for a while. Here's a tray I'm working on now. It made up of four pieces of walnut burl, laid in a four way match to cover the entire tray bottom. Then, inlaid into the burl is a banding of tulip wood set off with two strips of dyed black veneer.
I decided to inlay the banding after the burl was laid because burl breaks so easily that I didn't think I could inset it prior to glue-up. The straight pieces of banding are pretty easy, but the curved pieces are a challenge.
The inlay is finished here, and there's one coat of dewaxed shellac on it. I'll move to lacquer tomorrow.
As I make progress on this, I'll update the picture.

Here's the back of the panel, quarter sawn walnut laid in a radial match. There's on coat of dewaxed shellac on this also.

08/04/2014 I've been working on non-woodworking projects lately so I don't have any new work to post. However, I did receive notice that my lattice serving tray won a first place at the OC fair, and an Industry Award from Capistrano Hardwoods. I called it "Basket Weave" in my entry to the fair. The lattice strips are holly (if I remember correctly), the field is dyed wood (adobe color), the banding is tulip wood, and the border is mahogany.
While I was able to win an award with this design, I feel that I need to go in some new design directions. The main thing I'm not satisfied with is the rectangular "frame" of the tray. I have some ideas which I'll work on. If the ideas work out, I'll submit one or more to the fair next year.

04/01/2014 I've been doing woodworking but haven't posted things here recently. I'll try to put some additional pictures up soon. One thing I made, at the request of Judy, was a Lazy Susan. To cut it round, I used the MicroFence circle cutter. I rough cut the blank on my bandsaw, then finished it with the MicroFence and my router.
[Side comment: I have the Festool Carvex jigsaw and tried to cut the blank round with the Festool circle jig. It simply would not work. The jig saw kept trying to "go straight" (meaning that it would not follow the curve of the circle). I gave up on that jig and roughed out the blank on my bandsaw.]
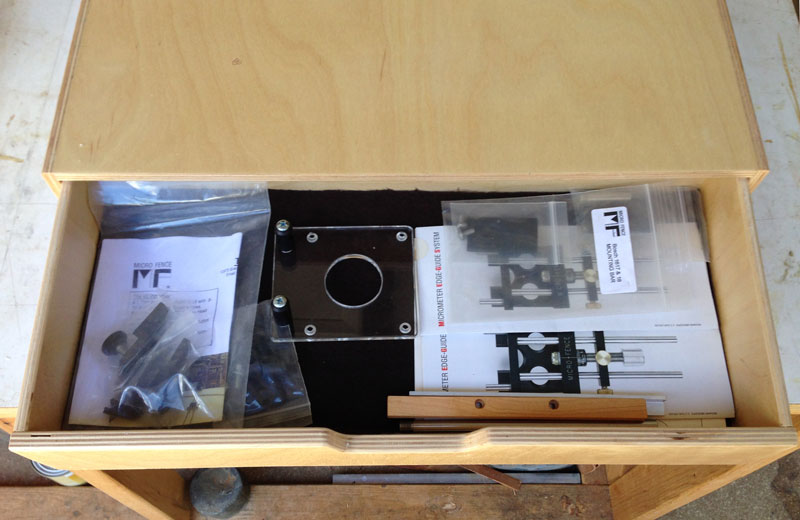
I've owned the MicroFence for quite a while and just had the pieces in a cardboard box. I decided that I need to have a better storage for the many pieces so that I wouldn't lose them, and decided to build a box with drawers. This is what I came out with. The inside of the drawers are 18 inches wide, about 9 inches deep, and 3 inches high. It's built from scrap plywood I had in the shop. I used the 4mm dominoes to put things together.
I have longer rods for bigger circles but I store those rods in a different place. I have the 2 foot and the 3 foot rods.

I put felt in the bottom of the drawers.
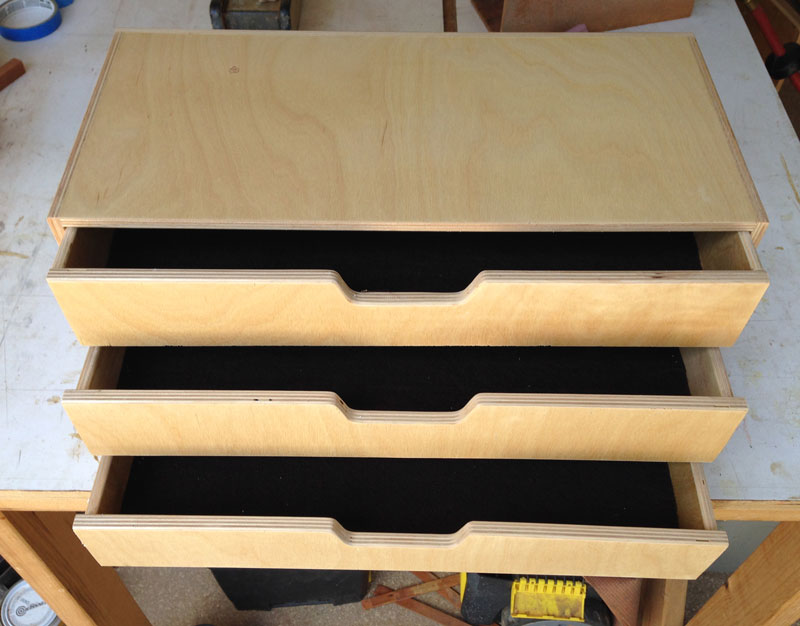
Here's how I stored the components, starting with the bottom drawer.

The middle drawer.

And the top drawer.
03/15/2014 Here's a Lazy Susan I built for my wife, Judy. It's made from a single cherry board that I had. The figure in the board was not something I wanted to use in a piece of furniture so it sat in my shop for years. But it worked for this. It's 26" in diameter and I used all of the board - there was very little scrap. I had to really plan how to cut it to save as much as I could.

3/1/2014 I did this lattice pattern tray mainly to explore doing a lattice as a marquetry project. Often a lattice pattern is done as a parquetry project, where the sand shading is done before the pieces of the lattice are cut. The challenge of doing a lattice as a parquetry project is to cut all the pieces very accurately so that the pieces can be then taken and laid into a lattice pattern. The background is especially difficult to get exact sizing.
Anyway, this is done as a marquetry project. The biggest problem is the sand shading on the pieces - the pieces tended to shade more on the sides so the "shadow" is not even across the piece. Not too bad but I notice it.
When doing a piece like this, one challenge is to get the background pieces put in so that the grain is consistent - so that it flows in a continuous manner. I had to mark the veneer for the background in such a way that I could look at the cut piece and tell which was was up so that I could insert it into the pattern with the correct orientation (of course, I mark on the veneer tape that I use to cover the veneer, not on the actual veneer.)
And here's the back. Nothing special, just mahogany laid in a 16 piece radial match.
I also did two more Louis cubes trays but they look pretty much like the picture below.
12/4/2013 Earlier, I had done a tutorial on Louis cubes, but had only taken the tutorial up to the completion of the panel. I finally got around to finishing that project, turning it into a small tray, which you can see here. You can see the tutorial here.

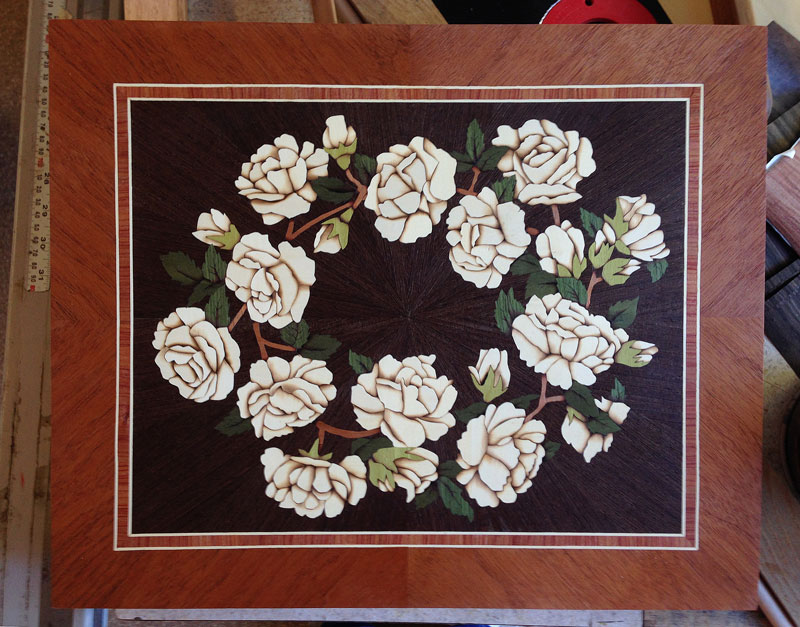
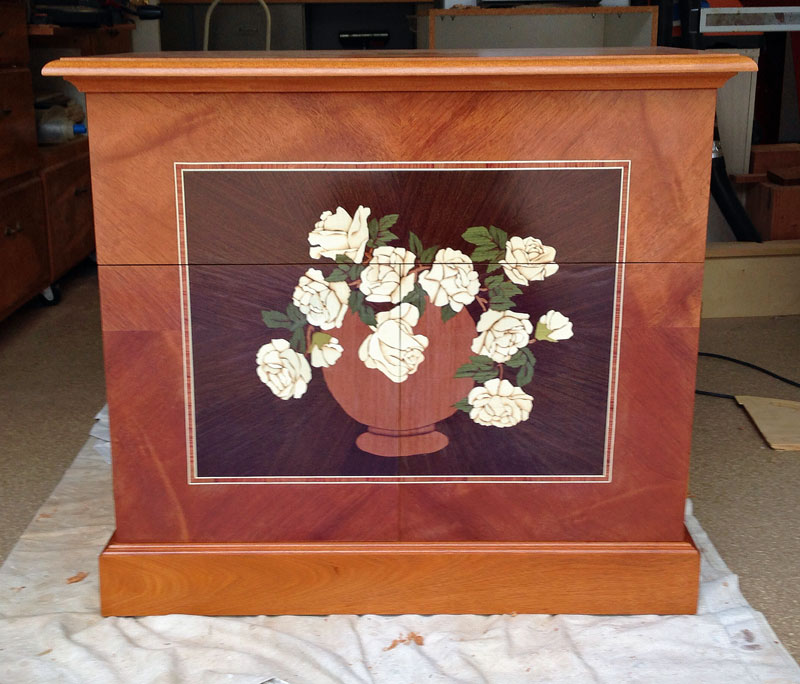
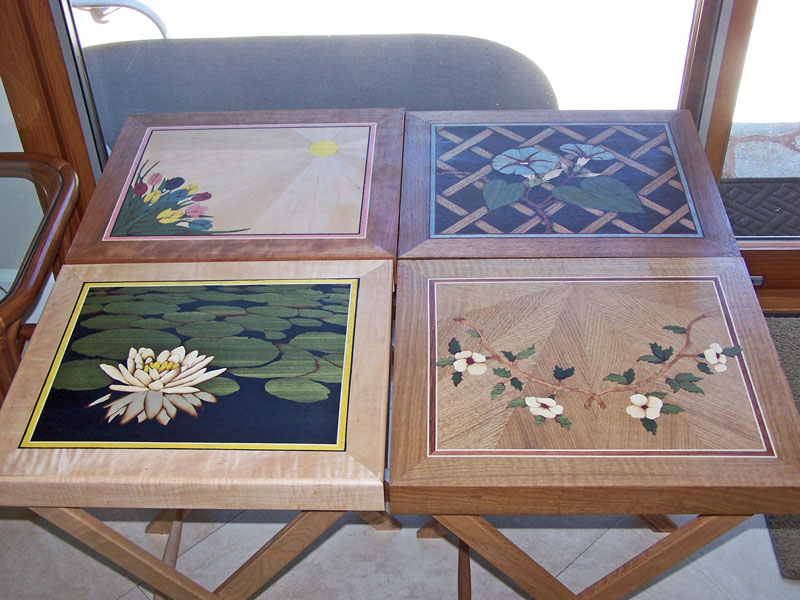
11/29/2013 I'm making the last tray for the cabinet for the party stands (which is described below). This one is a circle of white roses (I think I'm in my "white roses" period) on a background of wenge. The banding is tulip wood with holly accents. The border is mahogany laid at a 45 degree angle. It's a fairly complex piece, with almost 350 pieces. I'm pleased with the way it came out.
10/26/2013 I decided to do a simple hand tools project as relief from the complex marquetry that I've been doing for the past couple of years, so I decided to make a pizza peel.
It's made from clear pine that I had left over from some earlier, unremmebered project. It's 14" wide and 13" from front edge to beginning of the handle. I wanted to make it 14" by 14" but the left over pine was only so long and the handle would have been too short if I made it 14" by 14". The pine produces a peel that's very light and easy to handle.
It's a good hand tools project because tapering the peel can only be done with hand planes (at least I couldn't think of any other way). The pine planes very easily. I used spokeshaves to ease the edges. The finish is mineral oil.
It's a simple little project but it's nice to do a simple project now and then.


7/3/2013 I built a cabinet to house the party stands shown below in the posting of 6/20. You can see the build process here.
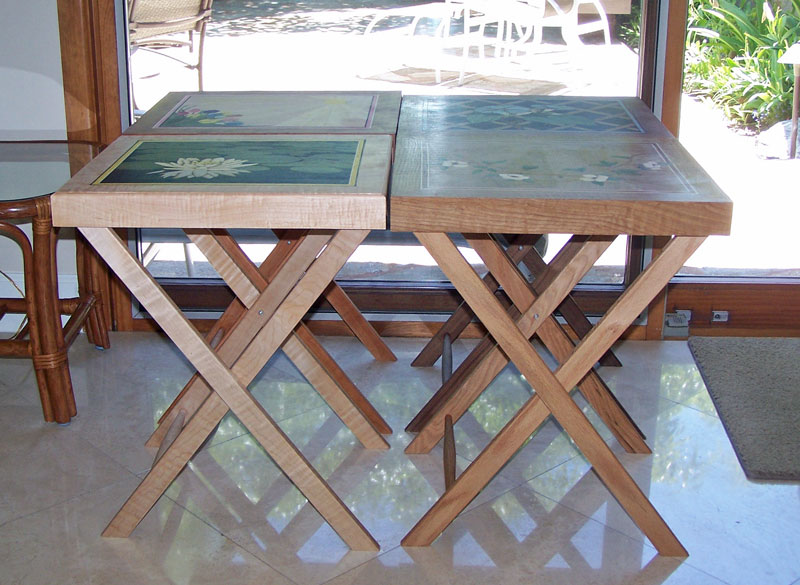
6/20/2013 Early in my marquetry education, I did some marquetry panels, partly for experience and partly because I wanted to make some folding stands for use during a party - for people to put their food and drinks on. I made four panels, each featuring a different wood - oak, cherry, maple, and walnut. But after I made the panels, some other project always got in the way of finishing the party stands.
Well, finally I just decided to complete them, and spent the past week or so making the legs and applying the finish. Anyway, here's some pictures of what I made. The last two pictures show how the legs support the stand, and fold up so the stand is flat for storage.


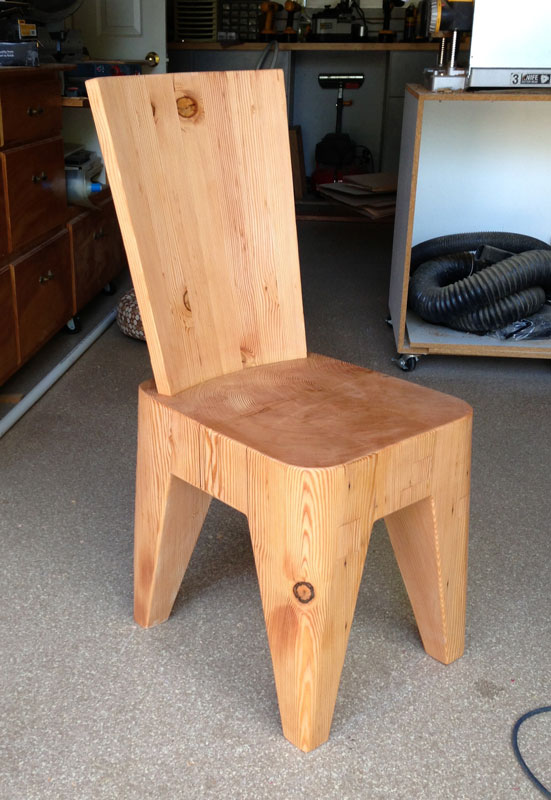
6/15/2013 Over the past few weeks, I worked on creating a chair from a beam that was given to me. Here's a picture of the beam and the finished chair. You can see the steps in creating the chair here or click on one of the pictures.

4/26/2013 Here's a panel I just finished for the owners of the Conger Ranch in South Dakota. It consists of a center of the Conger Ranch brand, in black in an ellipse of holly. As I understand it, the brand is read as "Bar, open A, Seven". Around the ellipse is banding consisting of bloodwood, green dyed veneer, and another ring of bloodwood. The ellipse is surrounded by sprigs of dogwood in a field of laurel burl. The banding around the field is holly and green dyed veneer. The border is walnut.
It was originally intended to be a serving tray but they changed their mind and decided to go with a wall hanging. The frame is a rope molding painted to look somewhat like rope. The "rope" doesn't show up well against this background.

4/10/2013 Here's the final of Judy's coffee table. I went with a high gloss on the marquetry shelf. I'm going to enter it in the OC Fair woodworking competition.
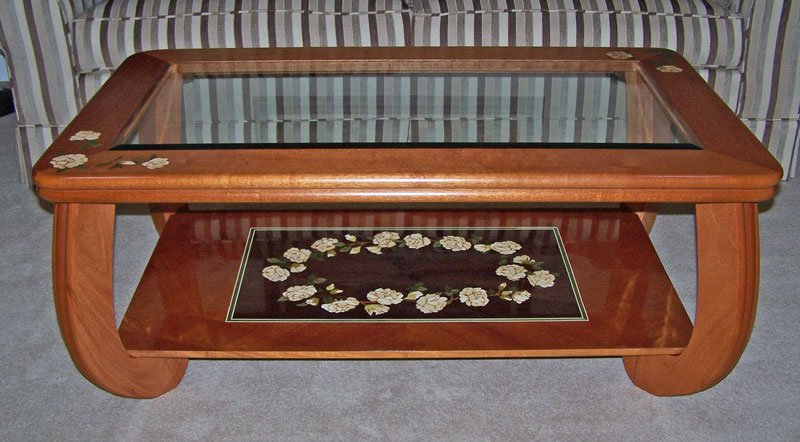
4/5/2013 I'm close to being finished with Judy's coffee table. I ordered the glass for the top and should receive it next week. Here's what the table looks like now.


4/1/2013 In between the other projects, I've been working on the marquetry for Judy's coffee table. It took me quite a while to draw the design, then I had to put a packet of veneer together and cut out the pieces - about 400 pieces. Then I had to sand shade the pieces and put them back into the field.
The background (field) is 16 pieces of wenge laid in a radial match. The rose petals are holly and the leaves are dyed green veneer. The stem is olive. The banding is holly and green dyed veneer. The border is figured mahogany. The picture is of the glue face - the show face will be a mirror image of what you see in the picture. Right now, there's veneer tape all over the show face. Still a lot to go, but I'm going to finish it in time for the OC Fair competition.

2/26/2013 We're going to host a large dinner party and needed some extra chairs. Some friends had six chairs that were in pretty bad shape but were willing to give them to us. I repaired and refinished them.
Several of the chairs needed repair - one had a loose joint form the seat into the back rail, another had some splitting of the back rail, that, while sound, would have caught on the user's clothes, two had places where the wood was damaged and needed a replacement insert, two has loose crest rails, probably form the chair falling over backwards, and the back splat on one was split from top to bottom.
In quality, they were good and bad. Well constructed, actually, with traditional mortise and tenon from the seat into the back rail. Many chairs from this era used dowels and dowel joints usually do not last. Only one joint was loose and it was because the back rail had split at the joint.
The wood is walnut but the selection was very poor. The pieces are cut from glued up stock, with light sapwood glued to dark heartwood - so you can easily see the joints. The crest rails were each very light which made finishing to a consistent color difficult.
The wood had been infested with woodworms at one time. As I sanded the chairs to remove the old finish, the woodwork larvae channels were exposed. There was no active infestation, however. I used wood filler to fill all the visible woodworm channels. As a side note, woodworms generally only eat sapwood, not heartwood.
The work process was to do all the repairs first, then sand the wood to remove the old finish. I did not remove the finish from the carved portions because I would have removed detail from the carving. I just finished over the existing finish.
To get the final color, I used a mixture of commercial stains, with extra staining required on the crest rails to get them to match the rest of the chair. The finish was one coat of dewaxed shellac followed by two coats of waterborne lacquer.
Originally, the seats were coil springs and the seat area was barely higher than the seat rails. I chose to use an applied seat built on a 3/8" cut to fit the chair - and each chair was different so each plywood seat has to be matched to its chair - I numbered them to keep track. The applied seat added to the sitting height of the chairs so I had to cut a bit off the legs to bring the seating height to normal. I cut 3/4" off the front legs and 1.5" off the back legs to give the seat backs a bit of an angle. I felt the original seat backs were too upright.
It took about a week to do all six. I expect they will give many more years of good service.

2/7/2013 Here's a progress picture of Judy's coffee table. There will be a shelf that sits on the flat parts of the legs and I'll put a marquetry design on the shelf so that it can be seen through the glass top. Still a lot to do but I'm making progress.
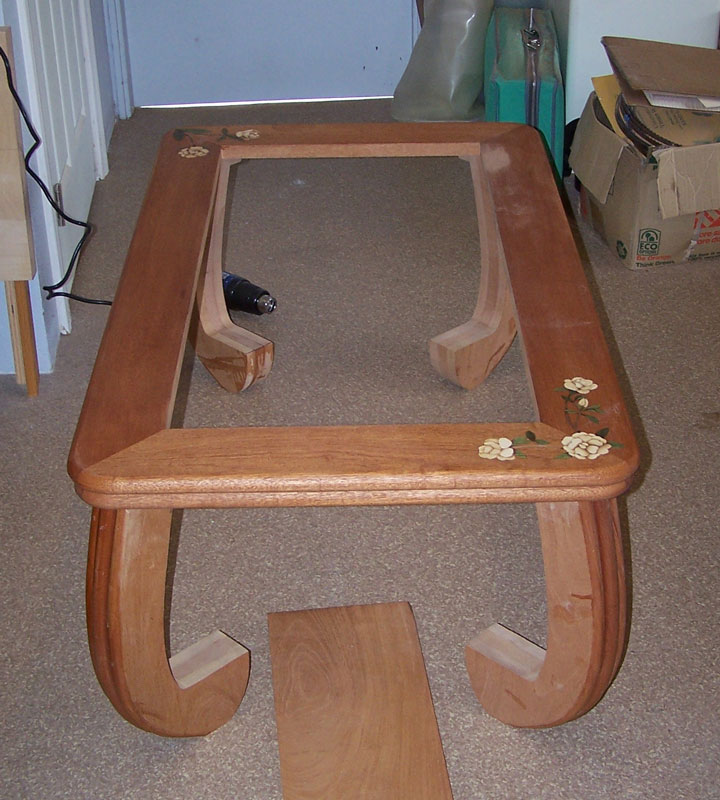
1/30/2013 My wife, Judy, has been asking me to build a coffee table for over a year. When the threats got really serious, I decided it was time to start building:-) The coffee table will have some inlay on the top, and a shelf below that can se seen through the glass in the middle of the top. The shelf will have a marquetry pattern, probably white roses in some design (that I still have to do).
Anyway, here's the inlay on one corner. Only two corners will have inlay - the other two corners will be plain. It was actually a difficult task to get the inlay in, especially the flower and bud on the right side of the picture - lots of very small, detailed work. I'm usually not satisfied with my work, but I felt this came out pretty good.

My projects continue here