

Mike's Woodworking Projects
Continued
Here's a box I made for one of Norma's clubs, to hold name tags. The box is made of walnut with banding inlaid in the top and around the bottom. Note the "chasing grain" in the side of the box. The sides are cut from a single board and in sequence so that the grain "continues" around the box, almost as if the board was wrapped around the box. A flower has been inlaid into the top, and the name of the organization was carved into the top (actually the bottom of the top so that you'll see the name when the box is open). The lid is made and hinged so the two halves will open all the way down to get them out of the way when people are retrieving their name tags. The finish is oil-varnish.
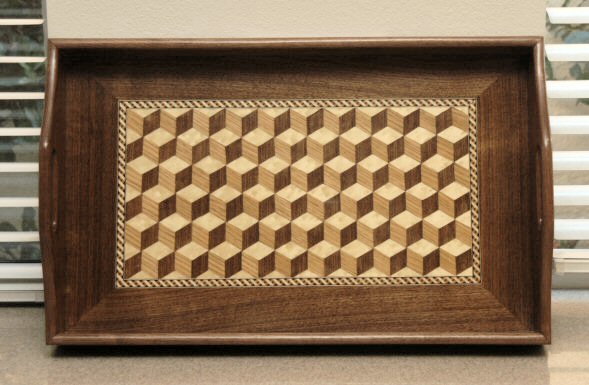
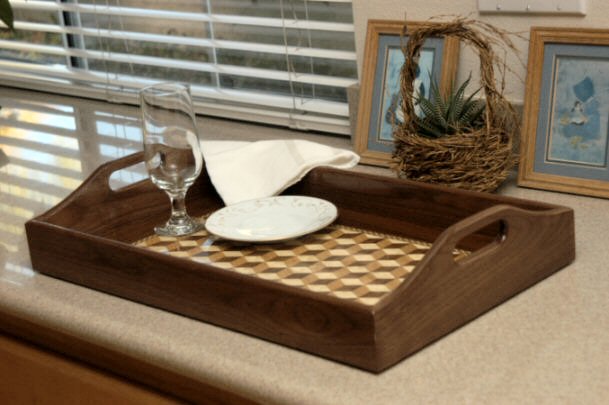
Last year, I became interested in working with veneer, especially parquetry. Here's a parquetry pattern, called "Louis Cubes," that I did recently as the base of a serving tray. This pattern is named after King Louis XIV of France, under whose reign this pattern became popular. I used walnut (including the border), oak, and bird's eye maple to make the bottom of the tray. The banding is commercial banding. The finish is rubbed lacquer. I chose lacquer to provide a tougher finish than oil-varnish, and to fill the small cracks between the pieces of veneer. The second picture shows the tray the way it will be used.
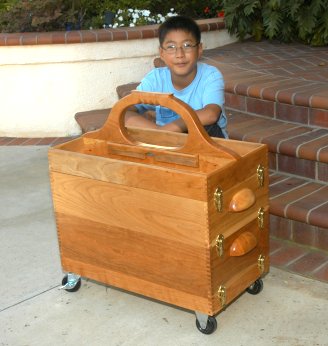
At left-below is my toolbox project for school (and William, a neighborhood friend). It's made of cherry and consists of a base, with wheels, a box for my planes, a box for chisels and carving tools, and a top. The boxes are hooked together with draw latches. When carrying just one of the boxes, the top can be used with the box without the wheeled base. The picture at right-top shows how the planes are nested into the box. I'll probably build one more box to carry miscellaneous tools, such as mallets, tape measures, sandpaper, and so forth. The lower picture shows the handles I made for my #5 plane. The front handle (knob) is egg-shaped, while the tote is larger and is shaped to my hand. Both are made of cherry. I made similar handles for my #7 plane but in walnut.


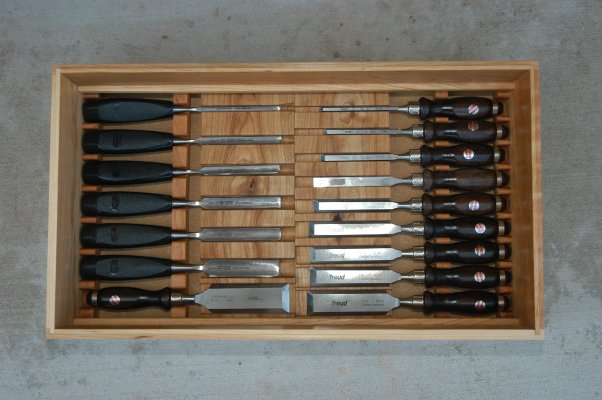
This shows how the chisels and gouges are nested in the chisel box. A groove is cut for each chisel or gouge, flat bottomed for the chisels and round bottomed for the gouges. I also built a tray for this box to hold my carving tools. I don't have that many carving tools yet. When I get a few more, I'll "inlay" them in the tray like I did for the chisels and gouges. Eventually, I plan to use these boxes as drawers in a work bench. Each box will be fitted into a "drawer-carrier" so that the boxes can be removed and stacked, as shown above, when the I need to transport the tools.

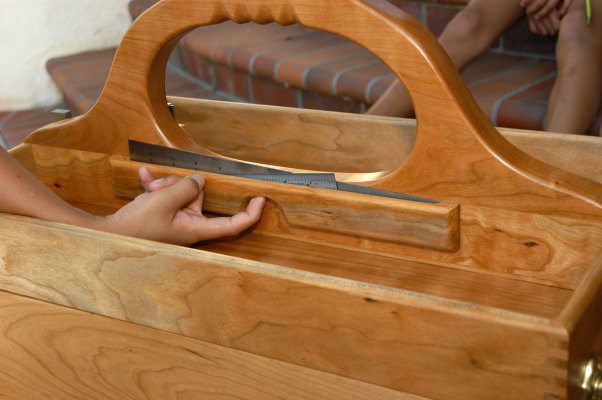
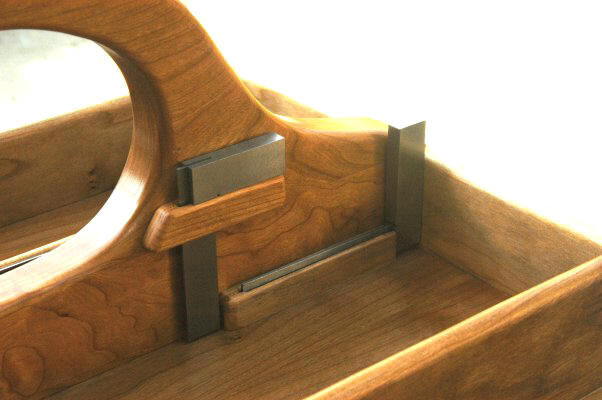
One of the advanced woodworkers at class mentioned that he had cut a groove in the edge of his toolbox to carry his rulers, since they always got lost in the bottom of the toolbox. I thought that was a good idea but didn't like the idea of the rulers sticking up at all, since you always catch the corners with your hand, so I made this ruler carrier (left picture). This carrier completely captures the rulers, with no corners sticking up. To remove the rulers, you have to use your finger to raise the rulers up. I also made some carriers for my engineer's squares, shown in the picture on the right.
I received a call from my niece asking me for some plans for a table. She wanted a folding table of a certain size. I searched for plans but could not find anything that was what she wanted and which I though she could make (she does not have a lot of tools, shop space, or experience). So I volunteered to build her a table of my own design. A gate leg table seemed like a good solution but most gate leg tables have the leg in the middle of a side, which gets in your way when you sit at the table. This led me to design a table with a triangular folding drop leaf so the gate leg would be at the corner. However, this makes the construction more difficult. She wanted the table in a light wood so I choose birch. I also considered maple but I don't like the yellow color maple turns with age. Triangular drop leaf tables like this are called "handkerchief tables".
The problem with this design was achieving sufficient torsional rigidity so that the table did not twist during use. The fixed legs are the only real members which resist torsion effects - the gate legs have hinges so they do little to resist torsional effects. I first used 5/4 lumber between the two fixed legs but this was not stiff enough. I had to reinforce the 5/4 with a 4/4 glued to the 5/4. I put the reinforcement opposite where each gate leg nestles when closed.
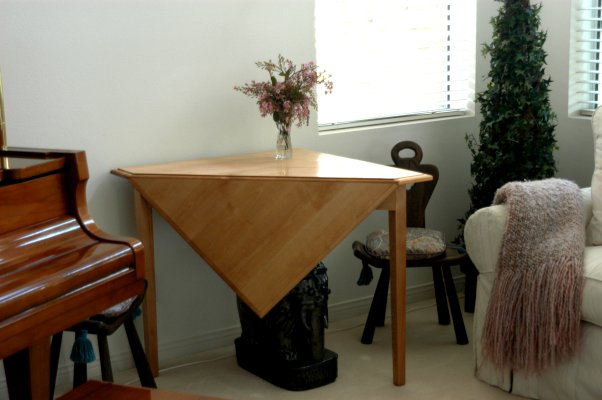
Here's the table fully folded, being held by Norma - the distaff side of H&H Woodworks. This was my first experience with rule joints. I used standard router bits to make the rule joints. The difficult part was to avoid tearout at the end of the cut because of the way the grain was running. I finished the table in brushed lacquer and rubbed the top out with 'wet-or-dry" sandpaper, up to 2000 grit, then polished the top with automotive polishing compound. I chose lacquer because I wanted a film finish on the top. Oil based finishes just do not do an adequate job of protecting a table top.
.jpg)
After I got most of my shop built, Norma decided that I needed to do some projects to justify all the money I spent building it. She wanted pullouts in the kitchen. I started with the pantry, converting shelves to pullouts. The pantry had four shelves per side but I put in five pullouts because you can't stack things as high on a pullout and you lose some space because of the drawer sides and the space for the runners. I put maple fronts on the drawers and custom fit each one so it is tight with the sides (I marked the drawers so I can put them back in the correct place). The little "dip" in the center of the drawer invites your hand but has no real purpose except decoration - the drawer fronts could have been flat just as well. After I completed the pantry, Norma "suggested" that I do the rest of the kitchen, all of the lower cabinets except the corner cabinets (because you wouldn't be able to get into the corners). Those came out nicely so Norma then "suggested" that I do all the other cabinets in the house, such as the bathroom cabinets. All told, I built 42 pullouts at an average cost of a bit less than $13.00 each. The cost went down as I progressed because I was able to get contractor pricing at Austin Hardwood, where I bought the runners, hardwood, and other supplies. Norma and I formed "H&H Woodworks" and that allowed me to get contractor pricing. You can find out more about how I built these pullouts here.
.jpg)

After this pergola project (see below), Norma suggested that we install crown molding in our home (she's a font of projects for us). We did essentially the whole house, except for some very high ceilings which I did not feel comfortable (safe) doing. It takes two people to install molding. Norma held one end of the molding while I held the other to do a trial fit or install. The flat ceilings were not too difficult, once I got the hang of doing molding. The really difficult work was in the area with cathedral ceilings, especially in our bath which has many things protruding into the room. I bought some books and corresponded with Wayne Drake, who's the guru of crown molding. He was kind enough to post pictures of our work here.
After I completed the molding project I began to work on building my shop. You can see some pictures of my shop here.
When we moved into our house ten years ago, my wife, Norma, had this concrete slab laid so that we could have a pergola and swing built on it. Over the years, she tried to find someone to build the pergola but the project was too small to interest most professionals. So when I started doing woodworking, this was the first thing she put on my "honey do" list. I built it out of redwood and used stainless steel screws to attach the boards across the top.
.jpg)
After I built the pergola, Norma wanted a swing. I found the plans for this swing in some book and modified it to suit our needs. I built it out of poplar because it was planned to be painted white all over. After building it, I hung the swing before sanding the seating area. I waited until I had the swing built before sanding this surface because I wanted to round over the seat rails to eliminate any sharp edges. I was going to paint the seating surface but when Norma saw the contrast between the white paint and the natural wood, she insisted that we leave it natural. I finished the natural portion with a clear polyurethane.
Update 2/14/05 - As some of you could have predicted, clear finishes just don't hold up outside. Within a year or so, the finish on the swing started peeling. I talked with Brian Miller, the "finishing" instructor at Cerritos College, and he confirmed that no clear finish will last outdoors. According to Brian, the absolute best clear finish will last no more than two years. He recommended that I remove the existing finish and apply an oil-varnish finish (several coats). He commented that this won't last either but it's fairly easy to replenish annually.
Update 5/21/05 - Another problem I had with the pergola was squeaking and "clicking" in the frame when we used the swing, especially if two people were on the swing. I finally tracked it down to wood movement between the post and the front-to-back supports. To prevent movement, I glued the supports to the posts and the noise went away. Of course, I will not be able to disassemble the pergola in the future, but I don't see that as a problem.
.jpg)
And to close, I include a picture of my assistant, Katherine, who provides invaluable assistance when I work in the shop. Her T-shirt says "Princess in Training" - Truer words were never spoken!

(use your back button to return to the page you were previously viewing)